As a follow up to my post on MSP432 printf functionality, this is a write-up of my notes on using the serial modules on the MSP432.
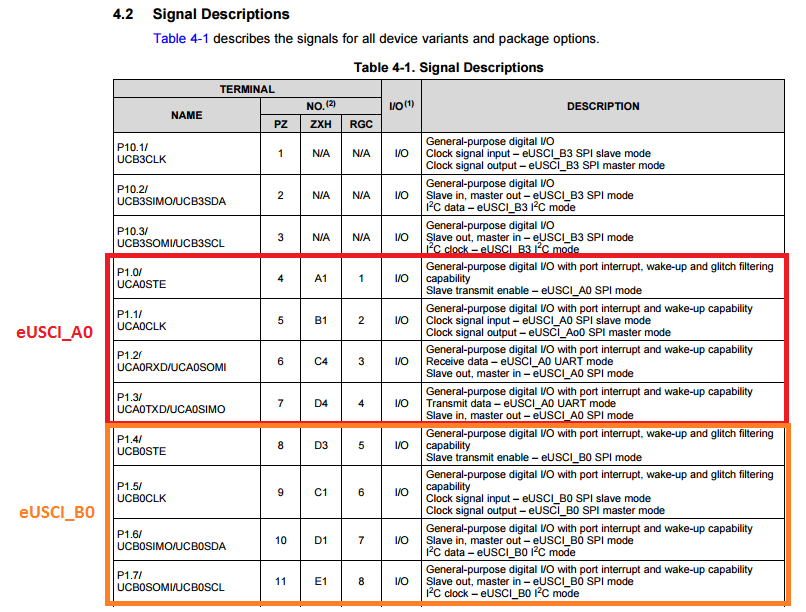
The MSP432 has two different types of serial modules; eUSCI_A modules and eUSCI_B modules. The eUSCI_A modules support both the UART and SPI protocols while the eUSCI_B modules support the SPI and I2C protocols. Using the MSP432 datasheet you can find which MSP432 pins correspond to the modules. The following picture, which is an excerpt from page 10 of the data sheet shows the pin mapping for the first eUSCI_A and eUSCI_B modules.

As each of the two modules support multiple protocols, you might not need to use all of the pins when you're using one of the modules. For example, if you wanted to use eUSCI_A0 for UART, you wouldn't need a 'slave transmit enable' pin or a 'clock signal input/output'. So you'd only be using P1.2 and P1.3. In fact, these are exactly the two pins you're using when you're communicating with your PC over UART as described in my previous post!
So now you know which pins to use, but how do you actually configure and use them? A word of warning first though: on the MSP432 launchpad, not all the eUSCI modules have pins exposed on the launchpad, so first check that the module you want has the relevant pins exposed on the launchpad. I've been playing around with a ESP8266 chip which talks over UART and have been using the eUSCI_A2 module which is on pins P3.2 and P3.3.
To configure the serial modules you have two choices; either read the family guide and toggle bits in all of the configuration registers manually or let TI do the heavy heavy lifting and use their driverlib. The driverlib is good but can be frustrating to use as the documentation provided is fairly minimal and you need to have an idea of what you're looking for first.
As an example of using the driverlib to configure a serial module, I'll step through the process of configuring the eUSCI_A2 module for UART with a baud rate of 9600 so that it can talk to my ESP8266 chip. The process should be similar for any serial chip that you want to interface with your MSP432 though!
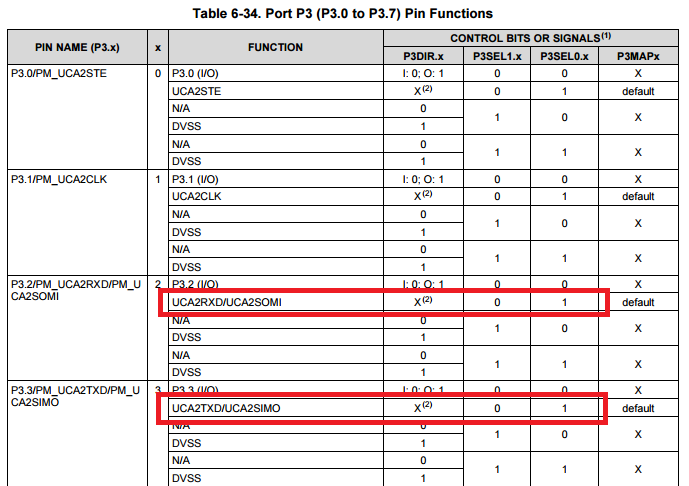
First thing first, we want to put the pins in UART mode. The pins we're specifically interested in are P3.2 and P3.3, they correspond to the RX and TX pins respectively. To do this, we need to look at the datasheet again and find where the pin functions are defined. The following picture is an excerpt from page 104 of the datasheet.

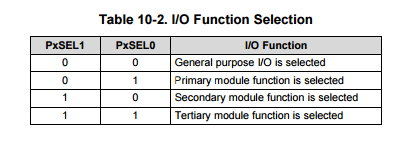
An 'X' in the P3DIR column indicates a "don't care". So for both pins, it doesn't matter if we set them to an output or an input when configuring them for UART. For the P3SEL1 and P3SEL0 columns, we need to consult the family guide. The next picture is an excerpt from page 483 of the family guide.

So to use the UART functionality of these pins, we're using the 'primary IO module function'. Now we have all the information we need to set the pins up in UART mode! Because it doesn't matter whether the pins are in output or input mode, we're able to use the GPIO_setAsPeripheralModuleFunctionInputPin function or the GPIO_setAsPeripheralModuleFunctionOutputPin function. For no reason whatsoever, I'll use the output variant. The result is the following line of code:
/* Set pins 2 and 3 of port 3 to the primary module function (UART) */
GPIO_setAsPeripheralModuleFunctionInputPin(GPIO_PORT_P3, GPIO_PIN2 | GPIO_PIN3, GPIO_PRIMARY_MODULE_FUNCTION);
The next thing to do is to define a eUSCI config. This is basically from the TI provided examples. The only tricky bit is generating the BRDIV, UCxBRF and UCxBRS numbers which in this case are 78, 2 & 0. Luckily, once again TI have provided a tool to do this. This tool finds the optimal way of prescaling and modulating the clock source you're using to achieve your desired baud rate. More information about this process is on page 721 of the family guide.
Using the tool with a clock of 12MHz and baud rate of 9600 Hz, gives a clockPrescalar of 78, a firstModReg of 2, a secondModReg of 0 and oversampling turned on. Converting this into a config, we get the following:
const eUSCI_UART_Config uartConfig =
{
    EUSCI_A_UART_CLOCKSOURCE_SMCLK,          // SMCLK Clock Source
    78,                                      // BRDIV = 78
    2,                                       // UCxBRF = 2
    0,                                       // UCxBRS = 0
    EUSCI_A_UART_NO_PARITY,                  // No Parity
    EUSCI_A_UART_LSB_FIRST,                  // MSB First
    EUSCI_A_UART_ONE_STOP_BIT,               // One stop bit
    EUSCI_A_UART_MODE,                       // UART mode
    EUSCI_A_UART_OVERSAMPLING_BAUDRATE_GENERATION  // Oversampling
};
The parity, MSB/LSB first and the amount of stop bits will all be determined by the device or chip that you want to communicate with. Now, to use that config to initialise the module using driverlib:
UART_initModule(EUSCI_A2_MODULE, &uartConfig);
This sets all the relevant registers to achieve the configuration earlier specified. If you're really interesting in understanding what exactly this is doing, it's worth reading the family guide. Now that the module is intialised, it can finally be enabled on!
UART_enableModule(EUSCI_A2_MODULE);
From here, you can send a byte of data to the module with the following driverlib function call:
/* sends the 'g' character to the A2 module' */
UART_transmitData(EUSCI_A2_MODULE, 'g');
If you want to simplify the process of sending individual characters (or instead want to send strings/numbers etc), check out my post about a printf function for the MSP432.
The whole code would then end up looking like this.
#include "driverlib.h"

const eUSCI_UART_Config uartConfig =
{
    EUSCI_A_UART_CLOCKSOURCE_SMCLK,          // SMCLK Clock Source
    78,                                     // BRDIV = 78
    2,                                       // UCxBRF = 2
    0,                                       // UCxBRS = 0
    EUSCI_A_UART_NO_PARITY,                  // No Parity
    EUSCI_A_UART_LSB_FIRST,                  // MSB First
    EUSCI_A_UART_ONE_STOP_BIT,               // One stop bit
    EUSCI_A_UART_MODE,                       // UART mode
    EUSCI_A_UART_OVERSAMPLING_BAUDRATE_GENERATION  // Oversampling
};


int main(void)
{
    /* Halting WDT  */
    WDT_A_holdTimer();


    /* Configure pins P3.2 and P3.3 in UART mode.
     * Doesn't matter if they are set to inputs or outputs
     */
    GPIO_setAsPeripheralModuleFunctionInputPin(GPIO_PORT_P3,
                GPIO_PIN2 | GPIO_PIN3, GPIO_PRIMARY_MODULE_FUNCTION);

    /* Setting DCO (clock) to 12MHz */
    CS_setDCOCenteredFrequency(CS_DCO_FREQUENCY_12);

    /* Configuring UART Module */
    UART_initModule(EUSCI_A2_MODULE, &uartConfig);

    /* Enable UART module */
    UART_enableModule(EUSCI_A2_MODULE);

    while(1)
    {
        /* Send the 'g' character over UART */
        UART_transmitData(EUSCI_A2_MODULE, 'g');
    }
}
Hopefully that's helpful in understanding a little bit about configuring the serial modules on the MSP432. If you have a question or just want to yell at me for getting something completely wrong, don't hesitate to reach out.
If there's interest in learning more about the MSP432's serial, in particular setting up and using interrupts, let me know. :)
